Εμφάνιση αναρτήσεων με ετικέτα ΣΤΑ ΑΓΓΛΙΚΑ. Εμφάνιση όλων των αναρτήσεων

Τετάρτη 6 Μαρτίου 2013

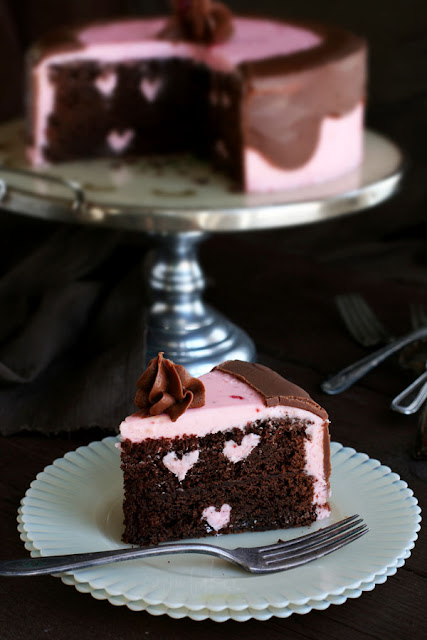
Chocolate Raspberry Cake!

sweets_chocolate_raspberry_cake

Ingredients

Raspberry Buttercream
  • 2 sticks room temperature butter
  • 1/2 cup raspberry jam
  • 2 tsp water
  • 4 cups powder sugar
Chocolate Glaze
  • 1 cup semi-sweet chocolate (I used chips)
  • 6 tbsp butter
Instructions
  1. For Raspberry Buttercream:
  2. Combine powder sugar, butter, jam and water in stand mixer. Start on low for 30 seconds, then turn to medium and mix until fully combined, about 2 minutes.
  3. For Chocolate Glaze:
Place butter and chocolate into a small saucepan over low heat. Stir until chocolate is melted and butter is incorporated. Remove from heat and allow to cool slightly.   


Brownies!

Mmmmm.... chocolate browniesssss!!  I love it.... 


prep time: 30 min
cook time: 30 min - 1 hour

Ingredients:
200g dark chocolate
100g milk or white chocolate
150g unsalted butter , plus extra for greasing the tin
125g dark muscovado sugar
125g golden caster sugar
4 free range eggs at room temperature
85g plain flour
2 tbsp cocoa powder plus a little extra for dusting, if you like
1/4 tsp fine salt


Preparation method:

  1. Preheat the oven to 180C/350F/Gas 4.
  2. Place a medium saucepan containing an inch of boiling water from the kettle onto the hob and bring to a simmer.
  3. Meanwhile, use a little butter to grease the inside of a 23cm/9in square baking tin. Cut a square of baking parchment a bit bigger than your tin (roughly 27cm/11in). Snip a 5cm/2in cut diagonally from the corners toward the centre. Push the paper into the tin and ease the paper into the corners neatly - they will overlap slightly. Trim if needed.
  4. Using a large sharp knife, chop the dark chocolate into small pieces (the smaller the pieces, the quicker it will melt). Place the chopped dark chocolate with the butter into a large mixing bowl that will sit on top of your pan of simmering water.
  5. Set the bowl over the pan of simmering water, making sure that the bottom of the bowl does not touch the water. Keep the heat low - the water should not be boiling furiously underneath, but quietly bubbling. After a few minutes the chocolate and butter will start to melt. Stir occasionally, until the chocolate is mostly melted. Remove the bowl from the pan and set aside. The residual heat in the chocolate will finish off the melting process.
  6. While the chocolate is melting, chop the white (or white and milk) chocolate into bigger pieces - about the size of a penny. Set these aside.
  7. Whisk the sugar into the melted chocolate, then add the eggs and whisk together well until the mix is slightly bubbly.
  8. Sift in the flour, cocoa powder and the salt into a separate bowl. Spoon the flour mix into the chocolate mixture, a large spoonful at a time. Fold the flour into the chocolate mix using a large metal spoon or a spatula.
  9. Gently pour the batter into the prepared tin, and scatter the remaining chunks of chocolate on top. Bake the brownies for 20-25 minutes. The brownies should still wobble slightly in the middle, as they will continue to cook for a little while when removed from the oven. An over-baked brownie is dry and crumbly, rather than moist and fudgy, so keep an eye on them.
  10. Let the brownies cool completely in their tin. Lift them out of the tin onto a board, using the baking paper to help, then cut into squares. Sift over a little icing sugar or cocoa powder. 
    Store in an airtight tin.

    Good luck!   
ΠΗΓΗ:http://www.travel-sweets.blogspot.gr/2013/02/brownies.html

Wedding cakes


1. 


serves: 104
several hours depending on ability

Ingredients
buttercream
 500gr unsalted butter
1kg icing sugar
jar good quality lemon curd
142ml carton double cream
200gr bar plain chocolate


Method.
1.  COVER THE FRUIT CAKE WITH THE MARZIPAN: How to do it: Boil the apricot jam with 2 tbsp water and sieve into a bowl.
 Brush the 15cm cake board with a little of the apricot jam.
 Cut off the rounded top of the cake and turn upside-down onto the board. Measure across the top and sides of the cake with string, cut to length and set the string aside. 
Brush the cake all over with a thin layer of apricot jam.

2. Dust the work surface with icing sugar and roll the marzipan into a circle big enough to cover the cake top and sides, using the cut string as a guide. Lift over the cake and smooth with your hands. Trim the marzipan to the base of the cake (so you can't see the board) and leave to dry for one day if time. If not, the cake can be iced straight away.

 3. FILL & COVER THE CHOCOLATE & LEMON CAKES WITH BUTTERCREAM: Adding good-quality lemon curd or silky chocolate ganache transforms simplebuttercream into an indulgent filling. 

4.  How you do it: First make the buttercream. Beat the butter until creamy, then gradually beat in the sifted icing sugar. Weigh 600g/1lb 5oz of the mix and stir 5 tbsp of the lemon curd into it. 

5. In a small pan, bring the cream just to the boil, then pour over the chocolate. Leave to stand for 2 mins, then stir until smooth. Once cool but still liquid, fold into the remaining basic buttercream.

6. Once each cake is completely cool, level off the top using a long serrated knife. Spread a little of the corresponding buttercream over the matching thin cake board. Turn cake upside down onto the board and brush all over with a thin layer of the sieved apricot jam - this helps to prevent stray crumbs getting into the buttercream. 

7. Cut into three layers horizontally - don't worry if you cut the layers unevenly as it won't affect the finished cake. If it's a hot day or warm in your kitchen, refrigerate the cakes for a while - it will firm them up and make cutting and lifting much easier. Lift off each layer as you cut it, and set it aside so that when you re-stack the layers they are in the right order.

8. If you've made the buttercream in advance and it has hardened slightly, warm in the microwave on Defrost for 10 secs and beat well. Using a palette knife, spread approx 1/4 of the buttercream over the first layer of the cake. For the lemon cake, swirl another tbsp or so of lemon curd over the icing. Stack the remaining layers this way, spreading all of the remaining icing over the top and sides of the cake, smoothing it down to meet the cardboard cake base. Smooth all over with your palette knife and set aside. The cakes are now ready for covering with ready-to-roll icing. Filled with buttercream and iced, the cakes will keep for up to 3 days. 
9. COVER ALL THE CAKES WITH READY-TO-ROLL ICING: The next stage is to subtly colour the different tiers with the ivory, dusky pink and cream colouring pastes. 

10. How to do it: For the marzipanned fruit cake only, first lightly brush with cooled, boiled water to help the icing stick. For all the cakes, dust the work surface with icing sugar and knead the icing until pliable. Add a few specks of the food colouring with a toothpick or the end of a skewer - be very sparing as a little goes a long way. Work the colour in until you have an evenly coloured, smooth paste. Add more and knead again if you want the colour to be more intense. 

11. Lightly dust the work surface again and roll the icing into a circle large enough to cover the sides and top of the cake, with a little excess. Use string to measure as before. Lift the icing over the cake, using your rolling pin to help you. 

12.   Smooth the icing around the cake with your hands, then trim off the excess with a sharp knife. Leave overnight to dry. Once iced, keep for 3 days.

13. Once you've iced the cakes, cover the 35cm base. Lightly brush with cooled, boiled water and cover with ivory-coloured icing. Trim and leave overnight to dry. 

14. STACK THE CAKES: Dowels give stability and strength to tiered cakes. By measuring and cutting the dowels to the same length, you're providing an even platform for the next cake to sit on, even if your cake is a bit wonky. For this cake, the tiers are stacked like steps, just off centre

15. How you do it: In a large bowl, gradually beat icing sugar into the egg white until thick and smooth. Cover with cling film until ready to use.

16. Starting with the chocolate cake, insert three dowelling rods in a triangle, slightly offset to one side and no wider than the base of the lemon cake that's going to sit on top. With a permanent pen, lightly mark where the top of the icing comes to on the dowel. 

17. Carefully pull out the dowels and line up on the work surface. Using a ruler, re-mark each rod to the highest point. Score the dowels with scissors around the new marks and snap the plastic cleanly. 

18. Re-insert the rods in their original holes, rounded end down. Cut the thin ivory ribbon to fit around the thick base board, securing at the back with glue or double-sided tape. To stack the cakes, spoon a little royal icing over each of the dowel holes. Carefully lift the chocolate cake onto the covered board, then stack cakes on top of one another, positioning each cake and gently lowering one side of it onto the base or cake below. Slide your palette knife under it at this point and gently lower the cake down. Slide the knife out at the last minute. (If you're moving the cake to the venue, put the cakes into their boxes and take the icing with you.) 

19. THE TIME PLAN: UP TO A MONTH AHEAD: 1. Make the fruit cake and cover with marzipan. 2. Make the chocolate and lemon cakes if freezing - they will freeze for up to 1 month (although they are best made fresh if you can). 

20.  

  • UP TO 4 DAYS AHEAD: 1. Make the chocolate and lemon cakes if making fresh - keep well rapped in baking parchment and cling film in a cool place. 2. Make the chocolate and lemon buttercream and keep in the fridge. 3. Make the chocolate and lemon cakes if making fresh - keep well wrapped in baking parchment and cling film in a cool place. 4. Make the chocolate and lemon buttercream and keep in the fridge. 

  • UP TO 3 DAYS AHEAD: 1. Fill and cover the chocolate and lemon cakes with buttercream and cover all of the cakes and the board with icing. 2. Insert the dowelling rods. 

  • UP TO 2 DAYS AHEAD: 1. Frost the rose petals. 

  • ON THE DAY: 1. Stack the cakes and decorate with petals once the cakes are in place.  
Good luck!! 


2. Orange berry. 

orange_berry_wedding_cake
 cook: 3 hrs
2-3 hrs for cake, plus 2-3hrs for other elements

Ingredients.
for cake 30cm
50gr butter
8 eggs
200 gr caster sugar
100gr ground almods
zest 2 orange
200gr plain flour
1tsp baking powder

orange syrup
4 tbsp caster sugar
6 tbsp water
2 strips orange peel
4 tbsp cointeau

Method.

1. TO MAKE THE CAKES: Heat oven to 160C/fan 140C/gas 3. Butter and base-line a deep, 30cm round cake tin (20cm round cake tin for the smaller cake) with baking parchment. Whisk the eggs and sugar together using a hand-held or tabletop mixer until the mixture leaves a trail when the whisk blades are lifted. This could take 8-10 mins, but don't skimp this step as it is crucial to the success of the cake.  
2. Fold in the butter, almonds and orange zest using a large metal spoon, then sift in the flour and baking powder. Fold everything together lightly, then pour into the tin. Bake for 50-60 mins (30-40 mins for the smaller cake) until firm to the touch. Cool in the tin for 5 mins, then turn out, peel off the paper and leave to cool completely. The cakes can now be frozen for up to a month.

3. TO MAKE THE ORANGE SUGAR SYRUP: Put the caster sugar in a small pan with the water and orange peel. Heat gently, stirring until the sugar has melted, then boil hard for 2-3 mins until slightly syrupy. Cool, then stir in the Cointreau.
4. TO MAKE THE CRÈME PATISSERIE: Whisk together the egg yolks, vanilla extract and caster sugar using an electric whisk until the mixture is pale and thick. Whisk in the flour. Boil the milk, then gradually whisk into the egg mix. Return to the pan and cook over a gentle heat, whisking until the custard is thick and glossy. Cook gently, stirring for 2 mins more to cook out the raw flour taste. Remove from the heat and beat in the butter.
Spoon into a clean bowl, then cover closely with cling film (so it's in contact with the custard) and leave to cool. Whip the double cream, then fold into the cool custard. Can be made up to 2 days ahead and stored in the fridge. Just before using, stir in the crème fraîche. This quantity makes enough to cover both cakes.

5. TO DECORATE: The day ahead of serving, split each cake in half; brush the cut edges with syrup. Lightly crush half the raspberries. Put the base of each cake on a cake board, then spread each with a layer of raspberry coulis. Scatter over the crushed raspberries followed by a thin layer of Crème patisserie (about one-third of the total amount). Cover with the other halves of the cakes, then chill.

6. Select about 6-8 long strands of redcurrant. Lightly beat the egg white and put the sugar in a shallow bowl. Brush redcurrants lightly with egg white, then coat lightly with sugar and arrange over a flat tray lined with baking paper. Leave overnight to dry out.
7. Spread Crème patisserie thinly over the tops and sides of the cakes. Measure the depth and circumference of the small cake, then roll one-third of the modelling paste into a sausage. Put this shape between two large sheets of baking parchment, then roll to the circumference of the cake and about 3-4cm more than the depth. If the paste splits, put it in the food processor with 1 tbsp oil and whizz it up, then re-knead and it should come back again to a smooth paste. Once rolled sufficiently, flip the whole lot over and peel away the uppermost sheet of paper. Trim the base of the paste in a straight line, leaving the top wavy.
8.  Carefully wrap the modelling paste around the cake with the straight edge to the base, pressing in the sides, then peel off the parchment. Repeat with remainder of paste for the larger cake.
9. Cut the dowels into equal lengths, about 2cm more than the depth of the larger cake, then insert 4 into the centre of the cake in a square formation, just smaller than the size of the smaller cake, then put two in the middle. On the day, place the smaller cake on top of the larger one, then fill around the edge of the large cake and the top of the small cake with the berries, finishing with the frosted redcurrants. Dust with icing sugar.

10. CHOCOLATE MODELLING PASTE: Melt the chocolate in a bowl set over a pan of barely simmering water, then leave to cool for a few mins. Heat the glucose gently in a pan, then tip into a large bowl. Gradually beat the chocolate into the glucose, beating to a thick paste that leaves the sides of the bowl clean. Place in a polythene bag and leave for about an hour until set firm.
11. To use, knead lightly until slightly softened. Microwave on Defrost for 10-15 secs if really firm, then use as desired. (Takes 10 minutes to prepare, 10 minutes to cook and makes about 1.8kg)   

Cupcake cake pops


1. cupcake pop.


prep time: 30min
makes: 48

Ingredients:

48 basic cake pops 900g chocolate candy coating
450g ounces pink candy coating
M&M’s or similarly shaped candy for the cupcake tops
Sprinkles

You will need:
Flower-shaped cookie cutter (11/4 inches wide by 3/4 inch deep)
Two deep, microwave-safe plastic bowls
48 paper lollipop sticks
Toothpicks
Styrofoam block


Method:
  1. Take a chilled cake ball and roll it into a cylinder shape. Then slide it into the flower-shaped cookie cutter. The cake mixture should fill the entire cutter, with any excess forming a mounded cupcake top on one side. You can use your thumb to keep the shape flat on one side, allowing the rest to form a mound on the other. When you have the shape the way you like it, gently push the shaped cupcake out of the cutter from the bottom.
  2. If the mixture is still firm enough, you should also be able to gently pull it out by holding the top mounded side.
  3. Place the cupcake-shaped cake ball, right-side up, back on the baking sheet. Continue with the remaining cake balls. Once the balls are all shaped into cupcakes, return them to the freezer for 5 to 10 minutes to keep them firm.
  4. While the cupcake shapes are chilling, melt the chocolate candy coating to use for the bottoms of the cupcake pops. Place the candy coating in a deep, microwave-safe plastic bowl. Melt the candy coating, following the instructions on the package. Microwave on medium power for 30 seconds at a time, stirring with a spoon in between. You can also use a double boiler. Either way, make sure you do not overheat the coating.
  5. Now you’re ready to dip. Take a few cupcake-shaped cake balls out of the freezer to work with at a time. Transfer the rest to the refrigerator at this point, so they stay firm but do not freeze. When you are ready to dip, set up another baking sheet.
  6. One at a time, take a cupcake-shaped cake ball and, holding it by the mounded top, dip the bottom into the melted chocolate candy coating just to the point where the mounded shape starts.
  7. Remove it from the chocolate, turn it upside down, and swirl your hand in a circular motion. This will cause any excess chocolate coating to slide down. When the coating reaches the bottom of the mounded cupcake top shape, you can stop. Have a tea towel handy to wipe off your fingertips, as it is highly likely that you’ll get some coating on them. Don’t use water to rinse your hands, as getting water in the coating can make it unusable.
  8. Place the half-coated cupcake shape on the wax paper–covered baking sheet, chocolate candy coating side up, mounded side down.
  9. Immediately dip about 1/2 inch of the tip of a lollipop stick into the melted candy coating, and insert the stick straight into the flat, chocolate- coated bottom of the cupcake while the chocolate is still wet. Push it no more than halfway through. Continue with the rest of the cupcake-shaped cake balls. Allow the chocolate to dry completely.
  10. To decorate the tops, melt the pink candy coating in the same way that you melted the chocolate. Holding its lollipop stick, dip the top of a cupcake in the melted pink candy coating. It should completely cover the rest of the exposed cupcake and meet the edge of the chocolate coating. Remove the cupcake pop from the coating and turn it right-side up. If the coating is too hot, it will start to drip down the sides. If this happens, let the coating sit for a few minutes to cool and start to thicken. Then when you dip the tops, the coating will stay in place.
  11. While the coating is still wet, use a toothpick to touch up any areas the coating may not have covered. Then place 1 M&M (M side down) on the top and add sprinkles for decoration.


 2. heart cake pop! 


Materials:
Cake pop mixture
Cocoa melting candy
Chocolate (brown) buttercream/frosting
Sugar sprinkles in pink
Rice paper
Pink modelling paste
Piping gel Edible lustre sprays in gold and pink
Lollipop sticks
Tools:
Polystyrene block
Disposable piping bag
No. 42c piping tube
Non-stick rolling pin 23cm
Heart cutter 3cm
Circle cutter 5cm
Blossom plunger 1cm
Non-stick board
Small scissors
Scallop tool/spoon
Greaseproof paper
Instructions:
1 Prepare some cocoa melting candy and secure the lollipop stick to the pop using the technique explained in the basic cake pop recipe. Make sure the stick is inserted into the middle of the flat base of the heart shape and be careful not to push it in too far. Chill flat on greaseproof paper on a baking tray in the fridge.

2 Dip each heart pop into the melted candy and return to the fridge to set.
3 Place a 5cm (2in) circle cutter on to a piece of rice paper and use a pencil to draw around it. Use plain or decorative craft scissors to cut out the shape and snip a small ‘x’ to create a hole in the centre, or use a hole punch. Spray the rice paper with a mixture of pink and gold lustre sprays and leave to dry.
4 Thread the coloured rice paper circle on to the prepared cake pop stick, through the ‘x’ or hole, and secure with a little buttercream.
5 Cut off the end of a disposable piping bag and place a no. 42c piping tube inside. Fill with a little buttercream of a medium consistency. Pipe a line along the top and base edges of the cake. Touch the piping tube to the pop, apply pressure to the bag, lift slightly and allow the line of icing to drop on to the pop, whilst turning the stick in the other hand.
6 Paint a little piping gel on to the top of the cake and transfer sugar sprinkles on to the gelled area using a scallop tool or spoon.
7 Roll out some pink modelling paste on a non-stick board and using a 1cm medium blossom plunger, stamp out a number of blossoms. Secure these on to the mini cake using a little buttercream. Pipe a buttercream centre in the middle of each one. Leave to dry in a polystyrene block. 

ΠΗΓΗ:http://www.travel-sweets.blogspot.gr/2013/02/cupcake-cake-pops.html

Yogurt, Fruit & Almond Parfaits

Yogurt, Fruit & Almond Parfaits 


prep time: 10 min 
yields: 2 servings


Ingredients
  • 4 almond cookie or macaroons, coarsely chopped (1/2 cup)
  • 2 cups Oikos® Greek 0% Plain or Vanilla yogurt
  • 1 cup diced fresh fruit (berries, peaches, apricots,)
  • 2 Tbsp. sliced almonds, toasted
  • 2 tsp. honey

Directions


  1. Place 2 tablespoon of crushed cookie in the base of two sundae or parfait style glasses.
  2. Layer with: 1/2 cup yogurt, 1/2 cup fruit and 1 Tbsp more of the cookies.
  3. Top with 1/2 cup yogurt, remaining cookies, toasted almonds and a drizzle of honey. 
Enjo 

Sugarpaste recipe


Ingredients Makes 1kg (2 1⁄4lb)
  • 60ml (4 tbsp) cold water
  • 20ml (4 tsp/1 sachet) powdered gelatine (you can use the vegetarian version)
  • 125ml (4fl oz) liquid glucose
  • 15ml (1 tbsp) glycerine
  • 1kg (21⁄4lb) icing (confectioners’) sugar, sieved, plus extra for dusting
Method:
1. Place the water in a small bowl, sprinkle over the gelatine and soak until spongy. Stand the bowl over a pan of hot but not boiling water and stir until the gelatine is dissolved. Add the glucose and glycerine, stirring until well blended and runny.

 2.Put the icing sugar in a large bowl. Make a well in the centre and slowly pour in the liquid ingredients, stirring constantly. Mix well. Turn out on to a surface dusted with icing sugar and knead until smooth, sprinkling with extra icing sugar if the paste becomes too sticky. The paste can be used immediately or tightly wrapped and stored in a plastic bag until required. 


ΠΗΓΗ:http://www.travel-sweets.blogspot.gr/2013/03/sugarpaste-recipe.html

Chocolate & mint cheesecake


 servings 6 

Ingredients:

  • 185g unsalted butter, melted
  • 1/4 cup (25g) good-quality cocoa, sifted
  • 1 cup (220g) caster sugar
  • 2 eggs
  • 1 cup (150g) plain flour, sifted
  • 50g dark chocolate, melted, cooled
Mint topping
  • 1/3 cup (75g) caster sugar
  • 1 bunch mint, leaves picked
  • 250g cream cheese
  • 3 eggs
  • 1/2 tsp peppermint extract (see note)
  • 100ml thickened cream
  • 2-3 drops green food colouring
Method:
  1. Preheat the oven to 160°C and grease and line a 20cm square loose-bottomed cake pan with baking paper.
  2. Place butter, cocoa, sugar, eggs and flour in a bowl and mix well to combine. Press firmly into the prepared pan and bake for 15 minutes or until set. Allow to cool completely.
  3. Meanwhile, for the mint topping, place sugar, mint and 1/2 cup (125ml) water in a saucepan over low heat and stir until the sugar dissolves. Increase heat to medium and simmer for 3 minutes, then set aside to cool completely. Strain the sugar syrup into a jug, discarding the solids. Place the cream cheese in a food processor and whiz for a few seconds to soften. Add cooled sugar syrup, eggs, peppermint extract, cream and food colouring and process until smooth.
  4. Pour the cheesecake mixture into cake pan then tightly wrap the base of the pan with foil to make it watertight. Place the cheesecake in a deep baking dish and fill with enough boiling water to come halfway up the sides of the cake pan. Bake for 25 minutes or until topping is just set – the cake may have a slight wobble but it will firm on cooling. Remove from the oven and cool completely, then chill for 2 hours or until firm.
  5. Cut cheesecake into slices, drizzle over the cooled melted chocolate and serve. 

Triple-choc cheesecake with salted peanut caramel-recipe


 12 servings

cook time: 45mins

prep time: 50mins


Ingredients:
  • Melted butter, to grease
  • 400g plain chocolate biscuits
  • 150g butter, melted
  • 5g butter, extra
  • 260g Woolworths Select Dark Cooking Chocolate, finely chopped
  • 150g Woolworths Select White Cooking Chocolate, finely chopped
  • 375g cream cheese, at room temperature
  • 100g (1/2 cup) caster sugar
  • 310ml (11/4 cups) thickened cream
  • 1 1/2 tbs hot water
  • 3 tsp gelatine powder
Salted peanut caramel:
  • 315g (11/2 cups) caster sugar
  • 185ml (3/4 cup) water
  • 250ml (1 cup) double cream
  • 120g (3/4 cup) salted roasted peanuts, coarsely chopped
Italian meringue:
  • 315g (1 1/2 cups) caster sugar
  • 60ml (1/4 cup) water
  • 4 egg whites, at room temperature
  • Pinch of cream of tartar

 Method:

  1. Release the base from a 6cm-deep, 22cm (base measurement) springform pan and invert. Brush with butter. Line the base with non-stick baking paper, allowing the edge to overhang. Secure the base back into the pan.
  2. Process the biscuits in a food processor until finely crushed. Add the butter and process until well combined. Transfer to the prepared pan. Use a straight-sided glass to spread and press the mixture firmly over the base and side. Place in the fridge to chill.
  3. To make the salted peanut caramel, stir the sugar and water in a large saucepan over low heat for 5 minutes or until the sugar dissolves. Increase heat to high. Bring to the boil. Boil, without stirring, brushing down the side of the pan occasionally with a wet pastry brush, for 18-20 minutes or until deep golden. Remove from heat. Stir in the cream. Place over medium heat. Cook, stirring constantly, for 2 minutes. Set aside for 30 minutes to cool. Stir in peanuts. Spoon over the biscuit base. Smooth the surface. Place in the fridge for 3 hours or until firm.
  4. Place the extra butter and 60g of the dark chocolate in a small microwave-safe bowl. Cook, stirring every 30 seconds, on High/ 800watts/100% for 11/2 minutes or until melted and smooth. Spread over the caramel to cover. Set aside for 10 minutes to set.
  5. Stir the white chocolate in a small heatproof bowl over a saucepan half-filled with simmering water (make sure the bowl doesn't touch the water) until smooth. Set aside for 5 minutes to cool slightly.
  6. Process the cream cheese, sugar and 185ml (3/4 cup) of the cream in a food processor until smooth. Add the white chocolate and process until well combined.
  7. Place the hot water in a small heatproof bowl and sprinkle with the gelatine. Place bowl in a slightly larger heatproof bowl filled with boiling water. Set aside, stirring occasionally, for 5 minutes or until the gelatine dissolves. Remove smaller bowl from larger bowl and set aside for 5 minutes to cool slightly. add to cream cheese mixture. Process until well combined. Pour cream cheese mixture over dark chocolate. Cover pan with plastic wrap and place in fridge for 4 hours to set.
  8. Stir remaining dark chocolate and cream in a saucepan over low heat until smooth. Pour over cheesecake. Place in the fridge for 1 hour to set.
  9. Meanwhile, to make the Italian meringue, stir the sugar and water in a saucepan over low heat until sugar dissolves, brushing down the side of the pan with a wet pastry brush to prevent sugar crystals forming. Increase heat to medium-high. Cook, without stirring, for 3-5 minutes or until the mixture reaches 115°C (soft ball stage). While the syrup continues to cook, use an electric beater to whisk egg whites and cream of tartar in a bowl until soft peaks form. When the syrup reaches 120°C (hard ball stage) and with the beater on low speed, gradually add syrup to egg white mixture. Increase speed to high. Whisk for 15 minutes or until thick, glossy and cool.
  10. Spoon meringue into a piping bag fitted with a 1cm round nozzle. Pipe peaks on top of cake. Use a blowtorch to caramelise the meringue.

Enjoy!! 


ΠΗΓΗ:http://www.travel-sweets.blogspot.gr/2013/03/triple-choc-cheesecake-with-salted.html

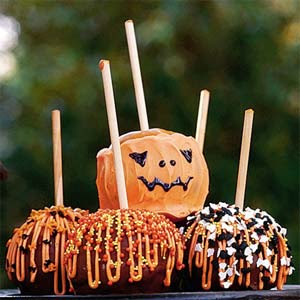
Beautiful apples recipes.

1. Candy-Coated Caramel Apples.


Ingredients:
  • 1/4 cup gummy worms
  • 1/4 cup Halloween sprinkles
  • 1 (1.4 oz.) chocolate and toffee bar, crushed
  • 1 (1.5 oz.) bag Reese's pieces
  • 1/4 cup candy corn
  • 1/4 cup small cinnamon candies
  • 8 small apples 
  • 1 (14 oz.) bag soft caramel candies, each unwrapped 
  • 1/4 cup heavy cream
 Method:
  • Line a baking sheet with parchment paper. Place candy (except caramels) in separate small bowls. Insert a craft stick into stem end of each apple.
  • Place caramels and cream in a heavy saucepan and heat on medium-low, stirring, until caramels have melted and mixture is smooth. Remove from heat.
Hold an apple by its stick over pot and spoon caramel over apple to coat, allowing excess to drip back into pot (if caramel gets too stiff, reheat for a minute or 2 to loosen). Press candy into caramel on apple and place apple, stick side up, on prepared baking sheet. Repeat with remaining apples and candy. Let apples stand until caramel has cooled, about 10 minutes    


2. Candy Apples.
 
Ingredients:
8 wooden craft sticks 8 medium Gala apples
2 (6.5-ounce) packages caramel apple wraps
1 (16-ounce) chocolate bar $
16 ounces vanilla bark coating
Orange paste food coloring
Toppings: colored sprinkles, chopped peanuts, black writing gel
 
Preparation:
Insert craft sticks into apples. Cover each apple with 1 caramel wrap.
Microwave at HIGH 15 to 20 seconds. Cool.
Melt chocolate bar in a small saucepan over low heat.
Dip each apple into chocolate; let dry.
Melt vanilla bark coating in a small saucepan over low heat; stir in orange food coloring.
Dip or drizzle each apple with vanilla coating mixture. Decorate with desired toppings, and let dry.